Installing Betaflight
How to install Betaflight firmware on your FC:
Using the Betaflight App, select the Firmware Flasher tab and select what firmware to flash in one of two different ways, online or local firmware.
- Load online firmware. Select Target and Version in the upper left corner. Press "Load Firmware [Online]", lower right part of the screen.
- Load local firmware.
Press the "Load firmware [Local]" button, you can now browse to the folder you have the local Betaflight firmware file. Select the correct firmware hex-file matching your Flight Controller.
 Leaving all options unchecked ** (defaults) press "Flash firmware". The Configuration tool should now erase the target and flash the selected firmware to your Flight controller. All this assumes you have the correct drivers etc setup correctly, read further on for details.
There are basically two classes of USB devices used by all FCs:
-
Type 1. Using a Silabs CP2103 USB interface chip. 1.1 Needs the Silabs CP210x driver. Used in both BootLoader mode for flashing and normal config mode. Shows up as a "COMx" device in BFC. http://www.silabs.com/products/development-tools/software/usb-to-uart-bridge-vcp-drivers
-
Type 2. Using the MCU integrated STM32 VCP USB interface. 2.1 Needs WinUSB driver when in BootLoader mode, for flashing. Installed by Zadig or ImpulseRC DF. Shows up as a "DFU" device in BFC. 2.2 Needs STM VCP driver for connection and configuration with BFC Shows up as a "COMx" device in BFC.
-
CC3D is a special case. It is an type 2 FC, but it is lacking the 2.1 USB-DFU interface as it is an STM32F1 based FC. All F1 based FC only has serial UART based bootloader interfaces. CC3D needs an external USB-serial adapter on UART1 for bootloader connection and flashing. (Or a secondary bootloader flashed, OP Bootloader for example).
Native USB based flight controllers - type 2
Note that this is for those controllers that are not using a hardware serial bridge - e.g. FTDI or SiLabs CP210x.
Driver issues can be fixed using this handy tool: https://impulserc.blob.core.windows.net/utilities/ImpulseRC_Driver_Fixer.exe
It requires .net framework v4.5. Available here: https://www.microsoft.com/en-au/download/details.aspx?id=30653
If you are having trouble connecting to your flight controller:

DFU flashing under Windows - USB DFU:
Make sure you have zadig if you're using Windows to enable the DFU driver. Instructions:
- Download Zadig: http://zadig.akeo.ie/
- Put device in DFU mode. If this is the first time to put Betaflight on you need to short the BL or BOOT pads (or press and hold the BOOT tactile button) while plugging the USB into the board.
- Open Zadig.
- Options > List All Devices
- Click on the drop down box and click the device listed STM32 BOOTLOADER
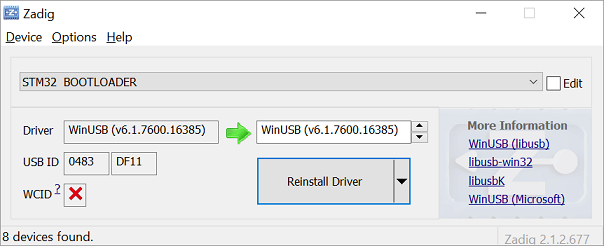
- In the box to the right of the green arrow, select WinUSB (v6.1.7600.16385)
- Click Install Driver
- After the install completes, restart your computer (you can cheat and ensure no browser is running - but it is not guaranteed to work). The board should stay in DFU mode - IF - usb power remains during the reboot. If not, execute step 2 again.
- Open up the Betaflight App.
- Go to firmware flasher, select "No reboot sequence"
- On F4 targets disable "Full Chip Erase". Use the config reset in Configurator later. (#200 reports the issue.)
- Load Firmware [Local]
- Browse to and select the proper hex file. (betaflight_REVO.hex for the revo, for example)
- Click flash firmware.
- The board should start flashing. First indicating an erase, then flash and finally verification.
- Once flashed your board will reboot, but you may need to install the STM VCP driver (see below) for the Betaflight App to connect to the board.
Installing STMicro Virtual Com Port (VCP) Driver under Windows:
Many of the F7, F4 (REVO, ALIENFLIGHTF4, BLUEJAYF4, etc), and some F3 boards (SPRacingF3EVO, STM32DISCOVERY) utilise the STM32 Virtual Com Port (VCP) - a CDC serial implementation. This allows the UARTs on board to be utilised whilst the USB is connected. This requires the STM VCP driver to be installed so that the VCP to be recognised as an additional comm port on the PC. NOTE: this is similar to installing a USB serial driver, e.g. FTDI or SiLabs
The STM32 VCP driver can be downloaded here --> http://www.st.com/web/en/catalog/tools/PF257938
NOTE: Once you download and run the installation it has not installed the driver, merely unpacked the choice of drivers. Locate the installation directory and then run the EXE file pertaining to your system.
e.g. C:\Program Files (x86)\STMicroelectronics\Software\Virtual comport driver\Win8\ <- will have two files present. One for 64 bit systems (dpinst_amd64.exe) and one for 32 bit systems (dpinst_x86.exe).
Windows 10
in many cases, the above might not work. installing Virtual COM port drivers from SiLabs will solve the issues: https://www.silabs.com/products/development-tools/software/usb-to-uart-bridge-vcp-drivers
Platform Specific: Linux
Linux does not know the concept of product specific 'device drivers', so no driver installation is needed. But there are a couple of steps required to make the Betaflight App work on linux:
Linux requires udev rules to allow write access to USB devices for users. If you are not familiar with udev rules don’t worry, we will walk you through the process in the proceeding steps using the command line interface (CLI).
Note: you might need to install libatomic:
$ sudo apt install libatomic1
Step 0:
Without next command the configurator will not launch on at least ubuntu 20.04 and higher
$ sudo usermod -a -G plugdev $USER
Step 1:
Since we will be using the CLI, simply copy and paste this command into your terminal, it will create the required file for you:
(echo '# DFU (Internal bootloader for STM32 and AT32 MCUs)'
	echo 'ACTION=="add", SUBSYSTEM=="usb", ATTRS{idVendor}=="2e3c", ATTRS{idProduct}=="df11", MODE="0664", GROUP="plugdev"'
	echo 'ACTION=="add", SUBSYSTEM=="usb", ATTRS{idVendor}=="0483", ATTRS{idProduct}=="df11", MODE="0664", GROUP="plugdev"') | sudo tee /etc/udev/rules.d/45-stdfu-permissions.rules > /dev/null
The file created is /etc/udev/rules.d/45-stdfu-permissions.rules, which is used when your flight controller is in DFU mode.
Step 2:
Make sure you've got permissions to access your flight controller in non-DFU mode (borrowed from https://github.com/GoldenCheetah/GoldenCheetah/wiki/Allowing-your-linux-userid-permission-to-use-your-usb-device):
Note: This example assumes that you know the device name of you USB device and that your userid has sudo privileges.
In this example our Linux userid is user and we are on the server called machine.
Our USB device is called /dev/ttyUSB0.
Check the current permissions and owner/group of the device.
[user@machine ~]$ ls -la /dev/ttyUSB0
crw-rw----. 1 root dialout 188, 0 Apr 3 21:16 /dev/ttyUSB0
For this configuration, the owner is root, the group is dialout and both the owner/group have read/write permissions.
What you need to do is make your login userid part of the group associated with the USB device.
For this case, we add the group dialout to our userid user using the usermod command. This command requires root privileges to run.
[user@machine ~]$ sudo usermod -a -G dialout user
You will need to log out then log back in and now you should have access to the device.
If you are still not added to the dialout group (you can check that using the groups command), try restarting your system.
Troubleshooting installation problems:
If you see your ttyUSB device disappear right after the board is connected, chances are that the ModemManager service (that handles network connectivity for you) thinks it is a GSM modem. If this happens, you can issue the following command to disable the service:
sudo systemctl stop ModemManager.service
If your system lacks the systemctl command, use any equivalent command that works on your system to disable services. You can likely add your device ID to a blacklist configuration file to stop ModemManager from touching the device, if you need it for cellular networking, but that is beyond the scope of Betaflight documentation.
If you see the ttyUSB device appear and immediately disappear from the list in Cleanflight Configurator when you plug in your flight controller via USB, chances are that NetworkManager thinks your board is a GSM modem and hands it off to the ModemManager daemon as the flight controllers are not known to the blacklisted
Sometimes, after other programs (configuration scripts, ESC firmware uploaders) have used the port that your flight controller is recognised as, and (i.e. /dev/ttyUSB0 or /dev/ttyACM0), and change modes on the port without resetting them. This leaves the configurator unable to connect to the flight controller, even after unplugging / replugging the USB cable. In this situation, the following command will reset the port settings to defaults:
stty sane -F /dev/\<your port>
Diagnosing if your CPU is dead, or just missing firmware (Blue LED of Death)
The symptoms between a fried CPU, and a CPU that is missing firmware is almost identical, with the exception that it is impossible to flash firmware to a dead CPU. CPUs may arrive from the manufacture dead, die when it first powers on do to a manufacturing defect, or die when if you wire up your board incorrectly (e.g. connect the 5v rail or battery power to a UART port). When a CPU dies, you may or may not see magic smoke.
The STM32 chipset requires 3.3v of power to operate, and so on-board dedicated voltage regulators are required to provide stable power to the CPU during operation. Since this is usually the only thing on the board requiring this voltage, you can determine if the CPU is fried using the following two methods:
- Use a multimeter to measure the resistance between the 3.3v pad on your flight controller, and any ground pin on the board. The resistance should be in the mid to high kilo-ohm range if the CPU is operational. The resistance will be near zero (1-3 ohms) if the CPU is dead.
- If you do not have a multimeter available, find the 3.3v voltage regulator on your flight controller, and connect it to power (i.e. USB). If the temperature remains low (about 30C), then the flight controller is probably okay. If temperatures rise quickly (between 80-150C), then the CPU is probably dead.
Video Tutorial:

Additional Tutorial Links
Start with the following video that gives a very comprehensive guide on Betaflight and the best practice approach for it's configuration: http://www.youtube.com/watch?v=xSzO6HP6yzs
New Video by Joshua Bardwell on the Betaflight App: https://www.youtube.com/watch?v=VAHUZZXIn9o
There is a step-by-step guide on how to flash the flight controller with Betaflight here: http://quadquestions.com/blog/2015/12/25/betaflight_flashing/
How to flash Betaflight on CC3D video guide: http://www.rcgroups.com/forums/showpost.php?p=34196999&postcount=21477
There is a topic on this FAQ page called "Which HEX target do I download and flash to my Flight Controller" that will help when it comes to deciding which file to use on your Flight Controller board. Also check the Boards section for more info on the FC board you have. Most have information (Note: these pages are to be maintained by the FC Designed/Seller or by dedicated Users) but some are blank.