RunCam Device Protocol
Description
RunCam Device Protocol is the serial communication protocol initially developed for the RunCam Split and analog cameras.
The protocol itself supports not only full camera osd menu navigation but also triggering recording on split style cameras as well as communicating the available sd-card space, syncing the current date, writing to the osd and turning the camera or wifi function (if available) on and off.
Not all features of the protocol are currently supported in betaflight but both betaflights support and the protocol itself are in continued development.
Lately similar to TBS SmartAudio and IRC Tramp other companies (for instance Caddx) started to adopt support for the protocol in their cameras.
Currently supported features in betaflight
- Full camera OSD control
- Starting/Stopping recording on split style cameras
- Triggering photo snapshots on runcam split cameras
- Wifi and power toggling on runcam split cameras
Protocol specification
The current protocol specification can be found here:
!http://note.youdao.com/groupshare/?token=9AD3F89F0B92488E8241F58CAEDF7939&gid=29699666
Setup
- One free non-inverted UART on the FC is required (TX and RX)
- Select Runcam Device in the Ports Tab in the Betaflight App for the used UART.
- Soft serial may work for some devices and some functions (Softserial has been reported to work with the Runcam Split 2/Mini at least for the record button function).
Supported cameras/devices and functions
Analog/classic fpv cameras
Any RunCam Camera that supports UART camera controls should work.
Micro Swift 3, Runcam Racer 2, etc.
Supported Features
- OSD Menu Control
- Shortcuts like scene switching
RunCam Split
RunCam Split cameras (1,2,mini and mini 2 etc.) also work however may require a firmware update. The first runcam split shipped with a different protocol - make sure to upgrade it either way as newer firmwares improved various things.
Supported Features:
OSD Menu Control
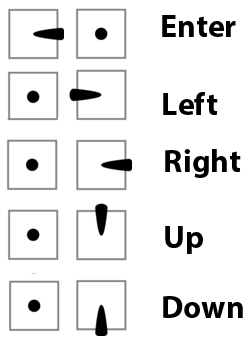
Entering the osd menu to change settings should work with the same stick commands as FPV Camera Control
Camera Button Simulation (Record/Photo/Wifi/Power Button)
Video demonstration: https://goo.gl/tm8CPS
Preparation
Firmware: BetaFlight Firmware (≥3.2.0) Configurator software: Betaflight Configurator (≥3.2.0)
Any available UART interface on the BetaFlight
1.Connect the RunCam Split with the UART interface of the Flight Controller

2.Make the Flight Controller recognize the Split
For example, we connect the Split to the UART 3 interface on the BetaFlight: connect the flight controller to the computer, then open the Betaflight App.
In the Peripherals column of the line UART3 (on the Ports tab), select RunCam Device and click Save And Reboot.

3.Instructions of the functions of the camera and assigning transmitter channels to them
In the Betaflight App, navigate to the Modes tab. There are new CAMERA WI-FI, CAMERA POWER and CAMERA CHANGE modes.
CAMERA WI-FI: turn on/off the WIFI of the camera. When in the OSD of the camera, this is used to confirm your selection. CAMERA POWER: start/stop the video. When in the OSD of the camera, this is used to move to the next menu item. CAMERA CHANGE MODE: switch among the three modes, video, photo and OSD setting mode. When in the OSD of the camera, this will exit the menu. Assign any available channel to the function you need, for example:
Assign the AUX1 to the CAMERA WI-FI, range 1900-2100
Assign the AUX2 to the CAMERA POWER, range 1900-2100
Assign the AUX3 to the CAMERA CHANGE MODE, range 1900-2100

4.Assign the channel to the switch of the controller
Please choose your Model on the controller, then access to the Mixer interface and assign the channel to the switch of the controller. Take opentx 2.2.0 for example, assign the channels CH5, CH6, and CH7 to SA, SB, SD respectively.

5.Test
Power the Flight Controller and the RunCam Split
Set the SA to the bottom, the camera turns on/off the WIFI Set the SB to the bottom, the camera starts/stops the video Set the SD to the bottom, the camera switches among the three modes: video, photo and OSD setting mode
Caddx Turtle v2
Caddx also implemented support for the RunCam Device protocol via their last firmware update. Please note however that only the turtle v2 correctly supports UART controls as the v1 had some incompatible connections on the board despite having UART pads.
For the v1 you can still use FPV Camera Control to enter the OSD and control the camera via your transmitter.
Beware that OSD control is disabled during recording.
CADDX support: Turtle V2 can support RUNCAM protocol without flashing firmware.
Turtle V2 has two different versions of hardware. Flashing the firmware may cause the yellow screen to not work. If you need technical support, please go to CADDXFPV official Facebook
Supported Features:
OSD Menu Control
Entering the osd menu to change settings should work with the same stick commands as FPV Camera Control
Camera Button Simulation (Recording)
Just as with the RunCam Split starting/stopping recording on a switch is supported. Follow the instructions outlined above to set it up.
Other supported devices
RunCam Control Adapter (OSD Cable Simulation)
The RunCam Control Adapter, which connects between the OSD pin and an UART on the FC, allows navigation of the OSD menu via the transmitter. Unlike the FPV Camera Control however no additional resistors or capacitors are required.
Depending on the device some shortcut keys are also supported. For example keeping roll pressed to to the right will switch the currently selected scene when using a Micro Swift2.
Setup Guide

List of confirmed compatible cameras
| Swift series | Compatible | Eagle series | Compatible | Sparrow series | Compatible | Owl series | Compatible | Sky series | Compatible | Nano | Compatible | |||||
|---|---|---|---|---|---|---|---|---|---|---|---|---|---|---|---|---|
| Swift 2 | Yes | Micro Eagle | Yes | Sparrow | Yes | Owl 2 | Yes | SKYPLUS | Yes | Nano | No | |||||
| Micro Swift 2 | Yes | Eagle 2 Pro | Yes | Micro Sparrow | Yes | Owl | No | SKY | Yes | |||||||
| Swift 2 Rotor Riot | Yes | Night Eagle 2 | Yes | |||||||||||||
| Micro Swift | Yes | Eagle 2 | Yes | |||||||||||||
| Swift Mini 2 | Yes | Eagle | No | |||||||||||||
| Swift Mini | Yes |