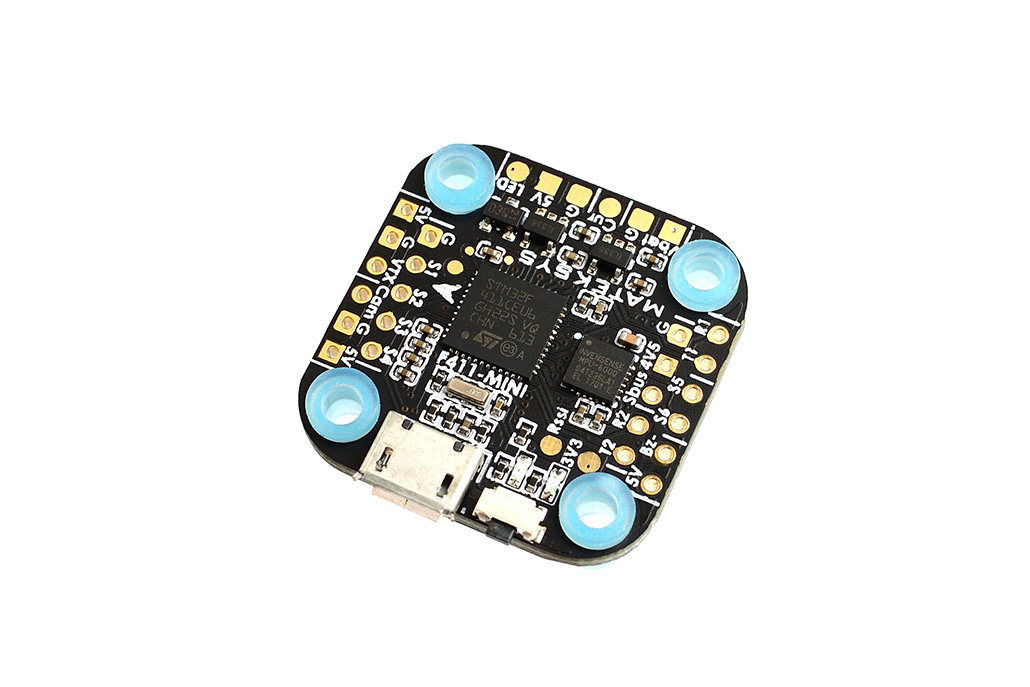
MATEKSYS F411-MINI
Description
F411+MPU6000, w/ BFOSD, No blackbox
MCU, Sensors and Features
Hardware
- MCU: STM32F411CEU6
- IMU: MPU6000(SPI)
- OSD: BetaFlight OSD w/ AT7456E chip
- Compass & Baro: no
- VCP: Yes
- Hardware UARTS: 1, 2
- Blackbox: no
- PPM/UART Shared: UART2-RX
- Battery Voltage Sensor: Yes 1:10
- Currsnt Sensor: No (FCHUB-A option)
- Integrated Voltage Regulator: 5V/2A
- Brushed Motor Mosfets: No
- Buttons: BOOT button
- 6 PWM / DShot outputs
- WS2812 Led Strip : Yes
- Beeper : Yes
Features
- Built in inverter for SBUS input (UART1-RX)
- 6x DShot outputs without conflict
- VCP, UART1, UART2
Manufacturers and Distributors
- Matek Systems
Designers
Matek Systems www.mateksys.com
Maintainers
- Hardware: Matek Systems
FAQ & Known Issues
Setup Guide http://www.mateksys.com/?portfolio=f411-MINI
Matek FC Facebook Group: https://www.facebook.com/groups/1882519175321708/
Example 5: Setup for Matek F411 mini for Tricopter in Betaflight 3.2.2 by Flashted
If Firmware update is needed on F411, it is best done in the CLI.
I have found these instructions work with the Betaflight 3.2.2, Something has changed in the higher versions that have made changes to how the tail servo outputs, and this method does not work with Betaflight 3.4.1, or higher.
I have not tried between version 3.2.2 - 3.4.0 either. I am at the moment trying to figure out what has changed, and why, but, if you want to try with higher versions, try it, and try to figure it out. Betaflight 3.2.2 works with a minimum of effort to get your craft flying.
In the future, I want to experiment with GPS rescue for tricopter, which Betaflight 3.2.2 does not support, so I am going to go foward to version 3.4.1 which supports GPS rescue, and start there.
If you power down the board, press the bootloader button on the Matek F411 flight controller, and plug back in like a lot of other boards, it does not enter bootloader mode, and there is NO blinking led confirming bootloader mode, at least with my windows 10 laptop. It does not work.
If computer can't detect it, reinstall DFU drivers with zadig or use this https://impulserc.blob.core.windows.net/utilities/ImpulseRC_Driver_Fixer.exe
To enter bootloader mode in CLI:
In CLI
Type
bl
enter
Then bootloader mode is enabled, and newer firmware can be flashed.
Do a full CLI dump, to have a reference to the original file before making ANY changes. You may need a fixed starting point in case you have to start over. You must assign it to be a tricopter "first", and then "save and reboot" it as a tricopter so that all resources, and their designations will show up in the CLI.
Setup:
The first servo output channel is used for tail servo The first motor output channel is used for tail motor The second motor output channel is used for right motor The third motor output channel is used for left motor.
The 2 front motors face forward and (tail) rear motor / servo facing towards you.
On the board:
Motor 1 - (rear) to motor output pin S1
Motor 2 (right) to motor output pin S2
Motor 3 (left) to motor output pin S3
Motor 4 motor output pin S4 is free, as this is a Tricopter.
Motor pin 4 will not work for tail servo due to timing issue.
(Tail servo setup is explained below, keep reading)
If you need more outputs for servos, or as I needed strobes, motor 4 (S4) can't be remapped to servo if motor 3 (S3) is assigned to a motor. If S5 is used for a servo, S6 can be remapped to a servo also. I used S5 for telemetry in Taranis.
You can also use RSSI pad or LED pads for servo outputs.
I chose to try to disable motor 4, and noticed that I lost motor 2 when I tried to calibrate the esc's due to some Betaflight strangeness. I re-asigned motor 4 back to the original assignment, and motor 2 worked again, no problems. Go figure...
In the BetaFlight GUI in the Receiver Tab is a selection for how the connection to the model is setup.
Betaflight Defaults to AETR1234 Aileron, Elevator, Throttle, Rudder(yaw) Aux 1 2 3 4.
This is an accepted standard setup on Taranis.
In the Configuration tab:
feature SERVO_TILT
feature CHANNEL_FOWARDING
Need to be OFF.
Selecting TRICOPTER sets yaw output to servo automaticly.
How to set the tail servo:
I chose to use pin 6 in my setup for tail servo, as pin 5 in my setup is used for telemetry, as I stated earlier.
In the CLI:
Type
resource motor 6 none
save
Then the pin will be free.
Pin on board is S6, and B10 is the location of the pin.
Type:
resource servo 1 B10.
save
Nothing needs to be changed in the Servos tab for movement.
Do not draw power from the board with a servo especially on a tricopter.
Positive, black negative are going to a pdb 5v output.
The yellow or white wire, signal wire can be connected to motor pin 5, motor pin 6, 7 or 8, will work.
IF you want to disable the tail servo when it`s not armed, go to the CLI.
Type:
set tri_unarmed_servo = OFF
save
Or if you want it on.
Type:
set tri_unarmed_servo = ON
save
Now check if your servo/motor are tilting in the correct direction.
If you move your yaw stick to the left, the motor must tilt to the right. If not, there are 2 ways to fix this.
In CLI:
Type
Set yaw_control_direction = -1
save
If you quickly move your tail to the right the motor must tilt quickly to the left, and vice versa.
You can just reverse the yaw direction on your Tx, but it is better to do it in the GUI, so the flight controller does not have to process the data.
Set the endpoints in the GUI so you have 40 degrees deflection in both directions, and neutral at as level as you can get it.
An analog servo works as will a digital one in most cases my directions were not reversed with an analog servo, but may be with a digital.
Hopes this helps.
Cheers!!!