Setup Guide
There are a few prerequisites to configure your craft running Betaflight. You will need to install the Betaflight App for your operating system. You will be using the app to configure your flight controller settings.
Connecting to your Flight Controller
Once you have the configurator installed and opened, you will be presented with the following screen:

You will need to connect your flight controller to your computer, usually via USB. If all goes well, you will see a
new COM port appear in the top right dropdown
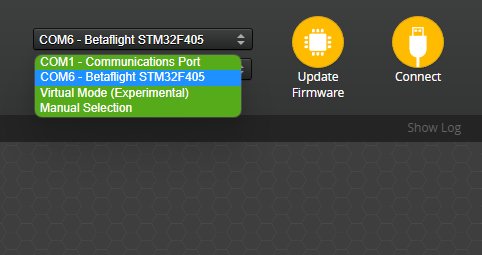
When you have a COM port selected, click the "Connect" button.
Not Showing up/Connecting?
If you do not see a new COM port appear, or the configurator cannot connect, there are a few ways to solve it:
- Make sure that you are plugging the USB cable into the flight controller, nothing else. Do not connect the Betaflight App to an HD system. Do not connect the Betaflight App to a radio transmitter. the Betaflight App is not meant be used with anything other than a flight controller
- Make sure you are using a USB cable that is capable of data transfer. Some USB cables are only for charging
- You may need to install the drivers for your flight controller. There is a download link for the ImpulseRC Driver Fixer tool in the configurator, or you can download it from the ImpulseRC Driver Fixer repository
- If you are still experiencing issues, try shutting down/uninstalling any other software that may be using the COM port. 3d printing software is a common culprit
Don't Immediately Flash
Resist the urge to flash your flight controller with the latest firmware. If it's a pre-built drone, it is more than likely that your flight controller has already been pre-configured with most of the necessary settings by the manufacturer, and flashing it will bring you back to a completely non-configured state. Even if you are building your own drone, the flight controller may have been set up with a default configuration that is possibly needed for some features. Just connect for now.
Basic Settings
Now that you've connected to your flight controller, you will need to follow some basic setup steps to get your drone in the Air. We'll go through setting up each part of a drone, and by the end you should be ready to fly with Betaflight and hopefully a deeper understanding of how it all works.
Once you have connected to your flight controller, you will land on the Setup Tab. When you move the flight controller, you should see the 3d model move in the configurator. That is a basic good sign that the flight controller is alive and working. While you are there, you can calibrate the gyroscope and accelerometer with the buttons and following the instructions. You can also calibrate the magnetometer, but that is not necessary for flight, and you may not even have one.
Backup Your config
Before making any changes, it's important to back up your current configuration. This will protect you in case of any
mistakes, and let you return to the original settings if needed. To do this, go to the CLI Tab tab and send either the
diff all or dump command. Then copy the output or save it to a file for later use.
Receiver Settings
The first setup step is to set up your receiver. If you are using a pre-built drone, you will need to figure out where the
receiver is connected to the flight controller. If you are building your own drone, you hopefully already know where
it is. A receiver with its signal wires connected to a (for example) RX1/TX1 pair of pads on the flight controller is
going to be on UART1. RX2/TX2 is UART2, etc. You need this info for setting up the receiver in the
Ports Tab. Enable Serial RX on the UART that your receiver is connected to.
The MSP switch is not to be used as a "toggle" for the current UART when setting it (for example) for Serial RX. It's a relatively common mistake to make, and then cause your config to not save to prevent unwanted behavior when conflicting options are set
If your flight controller has a built-in SPI receiver, you don't need to set up a UART for it. You can just set it up in the Receiver Tab.
Now that you have the Serial RX option enabled, you will need to set your receiver-specific settings in the
Receiver Tab. Whether you are using a pre-built drone or building your own,
you hopefully know what receiver you are using. From there, you can follow the instructions below for your receiver:
UART-based Receivers
In case you're using a UART-based receiver, you'll need to set the Receiver Mode dropdown to the
Serial (via UART) option, and set the Serial Receiver Provider dropdown to the appropriate protocol
based on your receiver. Here are the commonly used options:
- ELRS/Crossfire/Tracer - CRSF
- FrSky - SBUS/FPort
- Spektrum - Spektrum1024/2048, Spektrum SRXL2
- FlySky - IBUS
SPI-based Receivers
If you are using a SPI-based receiver, you'll need to set the Receiver Mode dropdown to
SPI Rx (e.g. built-in Rx), and the SPI Bus Receiver Provider dropdown to the appropriate protocol
based on your receiver, similar to the UART-based receivers. Here are the commonly used options:
- ELRS - EXPRESSLRS
- FrSky - FrSky_D for D8, FrSky_X(_LBT) for ACCST D16, FrSky_X_V2(_LBT) for ACCST V2 D16
- Spektrum - SPEKTRUM
- FlySky - A7105_FLYSKY(_2A)
Once configured properly, you should see the channel values change and the 3D model move in response to stick movements. If your channels are not properly aligned, adjust the Channel Map option accordingly.
VTX Settings
In most video systems, you don't strictly need to do anything in Betaflight to get video working. However, to get anything other than basic video output (VTX control, OSD info for digital systems) you will need to set up your VTX settings.
Analog VTXs
Analog is more or less the most common video system, even though it's as old as it is. It's a simple system that tends to "just work" without any configuration. However, if you want to change the channel, power, or other settings, you will need to set up SmartAudio or Tramp in the Ports Tab.
Enable SmartAudio or Tramp as a peripheral on the UART that your VTX is connected to, which you should hopefully
know. Then you can set up the VTX in the VTX Tab. It may seem overwhelming, but if
you're using a decently common VTX, you should be able to find a VTX Table for it somewhere on the internet, or even
find a preset for it in the configurator.
When you find a VTX Table online, it can be in two formats:
- CLI Code - This is the format that you can copy and paste into the CLI in the configurator, usually just found as text. It will look something like this:
# vtxtable
vtxtable bands 5
vtxtable channels 8
vtxtable band 1 BOSCAM_A A CUSTOM 5865 5845 5825 5805 5785 5765 5745 5725
vtxtable band 2 BOSCAM_B B CUSTOM 5733 5752 5771 5790 5809 5828 5847 5866
vtxtable band 3 BOSCAM_E E CUSTOM 5705 5685 5665 5645 5885 5905 5925 5945
vtxtable band 4 FATSHARK F CUSTOM 5740 5760 5780 5800 5820 5840 5860 5880
vtxtable band 5 RACEBAND R CUSTOM 5658 5695 5732 5769 5806 5843 5880 5917
vtxtable powerlevels 5
vtxtable powervalues 25 100 200 400 600
vtxtable powerlabels 25 200 500 1.5 2.5
- JSON - This is the format that you can copy and paste or load into the VTX Table section of the configurator. It will usually be a file to download, but can be found as plain text to copy and paste as well. It will look something like so:
Click to expand
{
  "description": "Betaflight VTX Config file for Rush Tank Ultimate",
  "version": "1.0",
  "vtx_table": {
    "bands_list": [
      {
        "name": "BAND_A  ",
        "letter": "A",
        "is_factory_band": true,
        "frequencies": [5865, 5845, 5825, 5805, 5785, 5765, 5745, 5725]
      }
      // ... more bands
    ],
    "powerlevels_list": [
      {
        "value": 0,
        "label": "25 "
      },
      {
        "value": 1,
        "label": "200"
      }
      // ... more power levels
    ]
  }
}
If you can't find a preset, nor a VTX Table, you can look through the manual for your VTX to find the settings you need to set up.
If your VTX is not able to be set to certain channels, or you are unable to set the power level higher, you may need to unlock the VTX manually. There are tutorials for that online, but it's usually as simple as holding down the button on the VTX for a few seconds on power up.
Digital VTXs
Digital VTXs are a newer form of video system that is becoming more and more common. It's a bit more complicated than analog, and needs setup to get OSD and VTX control working.
Start in the Ports Tab by enabling VTX (MSP + Displayport) as a peripheral on
the UART that your VTX is connected to. It should automatically enable MSP as well. If you're on a version older than 4.4, you will only need to enable MSP and then follow further.
Then in the Preset Tab, there are a few system-specific presets that you can use to make the setup easier:
- HDZero for 4.2/4.3 and 4.4
- Avatar 4.2/4.3
- FPV.WTF MSP OSD 4.2/4.3
- FPV.WTF + O3 + Avatar for 4.4
For further information on the newest firmware (4.4), please read the Release Notes
Motor Settings
Compared to the other settings, motor settings are pretty simple. In the Motors Tab,
start by setting the ESC/Motor Output dropdown to the correct protocol. This is usually DShot300 or DShot600 for
most ESCs available nowadays.
Choosing the correct DShot speed:
-
DShot300 is better for FCs with slower processors, like F411 boards. DShot600 is better for faster processors, like anything from the F7 family. F405 may work too, but it can cause too high of a CPI load when a lot of peripherals are in use
-
The DShot speed also depends on the gyro (and thus also the PID loop) speed. If you have a gyro that runs at 8kHz (MPU6000), you can use DShot600. If you have a gyro that runs at 3.2KHz (BMI270), you should use DShot300. Using higher DShot speeds on slower gyros shouldn't cause any issues, but it also won't give you any benefits
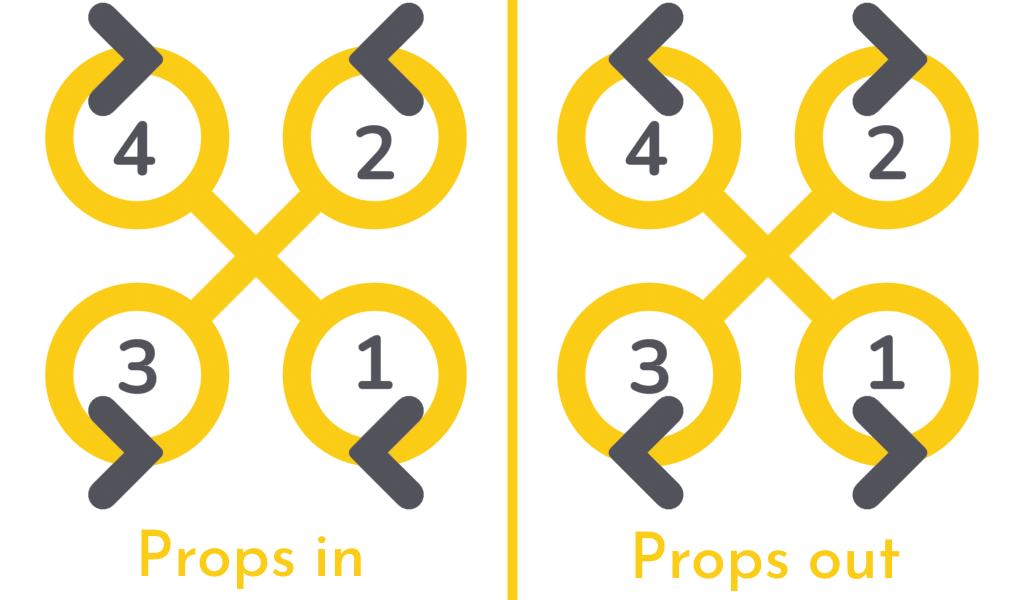
Once you have that set, you will have to remove the propellors (if you haven't already) and plug in a battery. Click
the checkbox to confirm that you have done so, and then you can slowly raise the Master slider to see the motors
spin up. They may stutter a bit at low slider values, but should spin up smoothly at slightly higher values. Check
that the motors all spin in the correct direction as set by the Motor direction is reversed toggle (also known as
Props in or Props out, see image below).
If they are spinning in the wrong direction, you can reverse them in the Motor direction sub-menu. If the motors
do not match up with the motor numbers, you will have to remap them
Mode Settings
Modes serve as a way to change the behavior or action of your quadcopter in flight by using AUX channels as inputs. In the Modes Tab, you will see a list of all the modes that are available.
Let's start with the only one you theoretically need:

The ARM mode serves as a way to activate the PID loop and allow the motors to spin. It is usually set to a switch.
- Click on
Add Range. This will add a slider to the mode, which you can use to set the range of the mode. It's a range of two values, and when the value of the assigned AUX channel is between those two values, the mode will be active. By default the range will be in the middle, so it will be active when the AUX channel is between 1300 and 1700 - The dropdown that says
AUTOis for the AUX channel selection. When set toAUTO, it will automatically select the AUX channel you change. So flip the switch you want to use to arm the quad, and the dropdown will change to that channel. If you want to use a different channel, you can select it manually - The little indicator on the bottom of the slider will show you the value of the AUX channel. Flip the switch into the position you want to arm the quad, and move the range over the indicator
Once you have the range set, then repeat the process for the other modes. You will likely also want:
-
BEEPER- Makes the beeper (and the motors, when set up) beep -
ANGLEtipThe default flight mode is called acro (sometimes called rate mode). As the name suggests, it's a mode where the position of the sticks controls the rate of rotation of the quad. This is the mode you will want to use for most of your flying. Activating any other flight mode overrides acro.
Angle mode is a mode where the position of the sticks controls the angle of the quad. This is useful for emergency situations, or for beginners who are not comfortable with acro mode yet
-
FLIP OVER AFTER CRASH- Reverses the motors to flip the quad over if upside downdangerThis can be very demanding on the motors and the ESC if the motors are stuck after crashing, and can cause the ESC or motors to go up in smoke. It's recommended to only use this mode if you know it's more or less safe to do so
OSD Settings
The OSD allows you to display information in the video feed from your quadcopter. In the OSD Tab, you can set up the different elements that will be displayed.
You have a list of all the elements on the left, and three columns of checkboxes next to it. Each column is for one OSD profile. OSD profiles are a way to have different layouts for different situations and be able to easily switch between them. Enabling the checkbox for an element in the first column will enable it for the first OSD profile, the second column for the second OSD profile, and so on.
When you enable an element, it will show up in the preview, and you can drag it around to move it as you like. There are also some settings for specific elements, such as selecting units of measurement, the source for the timers to time, and different warnings to display or ignore
You should have at least the following elements enabled:
Warnings- Displays warnings for low battery, low RSSI, and other thingsBattery average cell voltage- Displays the average cell voltage of the battery, regardless of the number of cellsLink quality,RSNR Value,RSSI Value,RSSI dBm Value- Different ways of measuring the strength and/or quality of the radio link. Choose the one that works best for your radio system, can usually be found in the manufacturer documentation
Ready to Fly!
With all the settings done, you should be ready to fly! Do a final check to make sure that everything is as it should be, and do a quick hover test to make sure that everything is working as it should.
If something is not working, go through this page, some of the more common mistakes should've been listed. If not here, you can read the troubleshooting page to see if you can find a solution. If you can't find one, ask in the Discord server