Troubleshooting
It is an unfortunate fact that sometimes things just go wrong. Be that on by a fault in the software, or a user configuration error. This page will cover some of the more common issues that you may encounter, and how to resolve them
Connecting Issues
No COM Port Appears
- Make sure that you are plugging the USB cable into the flight controller. There may be parts thay may have a USB port, so don't confuse it with your flight controller A DJI Air Unit is a video transmitter.
Neither should you try to connect your radio to the configurator. Betaflight Configurator is not meant be used to set up your radio, use your radio's software for that (OpenTX companion, EdgeTX Buddy, etc.) - Make sure you are using a USB cable that is capable of data transfer. Some USB cables are only for charging
- You may need to install the drivers for your flight controller. There is a download link for the ImpulseRC Driver Fixer tool in the configurator, or you can download it from here
- If you are still experiencing issues, try shutting down/uninstalling any other software that may be using the COM port. 3d printing software is a common culprit
No COM Port Appears After Enabling HID
If you enable HID Joystil emulation in the configurator, it will take over the USB connection. If you need to connect to the FC normally again, enable Show all serial devices in the configurator options
![]()
Can Connect to the FC, But Can't Flash
Usually also caused by missing drivers. You can install the drivers using the ImpulseRC Driver Fixer tool, which can be downloaded here. You may also want to install all the necessary drivers manually. Starting from Windows 10 we no longer require STM32 VCP drivers.
Setup
Sensors Not Detected
If all of the sensor indicators in the configurator are grayed out, it means that the flight controller is not detecting any sensors. This can be caused by a number of things:
-
The sensor(s) are not configured correctly and/or not enabled
-
If using an external sensor or peripheral, make sure it's also connected correctly (If connected to a UART port, make sure that the signal wires connect as "TX to RX" and "RX to TX". If they're connected "TX to TX" and "RX to RX", it will not work)
-
If you have flashed the wrong firmware, the flight controller may not have the correct drivers for the sensors. Make sure you chose the correct target for your flight controller when flashing, and applied the custom defaults when prompted to
-
With Betaflight 4.4 and the new cloud build system, make sure that you have the appropriate options selected when bulding the firmware
Gyro Response Does Not Match Real Movement
Usually caused by the FC being mounted at an angle different to its default orientation. You can fix this by changing the Board Alignment settings in the configurator
Settings Reset to Default
If you're trying to save a specific configuration, but it keeps resetting to default, it's likely that you have an incompatible set of changes. For example when trying to enable both MSP and Serial Rx in the ports tab at the same time. Make sure that the settings you want to save don't conflict with each other
CPU Usage Too High
CPU usage being too high can result in inconsistent loop times, which can cause various issues of varying severity. This is mainly an issue on F411 or F405-based boards. If you're experiencing issues, try the following:
-
Disable any features that you don't need. The new Cloud Build system allows you to select which features you want to include in your firmware. But if you're using a version preceding 4.4, you may need to disable features manually
-
Lower the DShot speed. Going from DShot600 to DShot300 is often enough
-
Disable BiDirectional DShot. BiDir DShot allows for more direct filtering, but is more CPU intensive
-
Disable some OSD elements. If you have too many active elements, it can put a lot of strain on the CPU
BiDirectional DShot Not Working
Enabling BiDirectional DShot in Betaflight is often not enough. You may need to change your ESC settings, the specific changed vary between BLHeli_S and BLHeli_32 ESCs:
-
BLHeli_S cannot do BiDir DShot on its own. You need to flash a custom firmware like Bluejay
-
BLHeli_32 can do BiDir DShot on newer firmware versions. Make sure to update your ESCs to the latest release
Receiver
No Receiver Input Detected
-
Make sure that the receiver is powered on and bound to your transmitter
-
Make sure that your receiver is connected correctly - make sure that the signal wires connect as "TX to RX" and "RX to TX". If they're connected "TX to TX" and "RX to RX", it will not work
-
In the Ports Tab, make sure that the
Serial Rxoption is enabled for the port that your receiver is connected to -
In the Receiver Tab, make sure that the
Serial Receiver Provideris set to the correct protocol for your receiver -
If you are using an external receiver but also have a DJI Air Unit connected, make sure that the Air Unit SBUS wire is removed from the plug
No Switches Detected
If you only get input from the four main channels, but not the aux channels, it's most likely that your transmitter itself is not transmitting any additional inputs. You can add individual switches to the channels in the Mixes page in your radio's menu if it's running OpenTX or EdgeTX
The Channel Order is Wrong
If your radio input does not match up to what you see in the preview, you need to change the channel map. There are also preset options for some of the more common systems:
- FrSky/Futaba/Hitec - FrSky, Futaba, and Hitec receivers output the channels in the same order as the Betaflight default (AETR1234)
- Spektrum/Graupned/JR - Spektrum receivers output the channels in a different order than the Betaflight default (TAER1234)
If the preset options don't work, you can try changing the channel map manually. The channel map is a string where each letter represents a channel. The default is AETR, which means that the first character is the Aileron channel, the second is Elevator, and so on. You can change the order of the letters to match your transmitter
Video
No OSD
-
Analog:
-
You need the video signal to pass through the FCs onboard OSD chip. If your camera is connected to the VTX directly, you won't get any OSD
-
Make sure that the
OSDoption is enabled in the Configuration Tab -
The preview in the configurator may not be accurate to what you see on your goggles. Some elements on the edges may be cut off. Start by placing them near the center, then move them slowly to the edges to see when they get cut off
-
Although rare, there are some FCs that do not have an OSD chip at all. If you're using one of these, you will not be able to get analog OSD
-
-
Digital:
As digital systems are still relatively new, and so is fully-customizable OSD, the setup process may change from version to version. If you're following an external tutorial, make sure that it's up to date
-
In 4.3 and earlier, the setup was a little more convoluted, requiring a bit of CLI work. In 4.4 and later, the setup is much easier, and you can simply enable the
VTX (MSP + Displayport)option in the Ports Tab -
There are presets to make the following setup easier, pick the correct one for your system
-
If you're using DJI with WTFOS, make sure that it's up to date
-
Little to No Video Range
-
Make sure that the VTX antenna is connected. If it's only partially connected, or disconnected entirely, you will get very little range and you will likely damage the VTX
-
Make sure that the VTX is getting sufficient power. Some VTXs take 5V and 5V only, some accept a wide range of voltages. Make sure to use a high-enough voltage to power the VTX
-
The VTX may be in Pit Mode. Pit Mode is a feature that makes the VTX transmit at very low power, or even to not transmit at all. If you're using a VTX that supports Pit Mode, make sure that it's not enabled when you're flying
-
The VTX may be running at low power. Most VTXs have adjustable power outputs, but they may need to be changed to output at full power. Similar to Pit Mode, you need to change it in the Video Transmitter Tab
Cannot Change Font
-
The FC may need to be powered on from the battery to make sure that the OSD chip itself gets power, some FCs do not power the OSD chip when powered from USB
-
SImilarly to the
No OSDproblem above, there are some FCs that do not have an OSD chip at all. If you're using one of these, you will not be able to change the font
Flight Issues
Drone Won't Arm
-
You need to have an
ARMmode set up, which can be done in the Modes tab You can also arm using a stick command, but that is pretty dangerous and not recommended -
There is a lot of checks that need to pass before the drone can arm. If any of them fail, the drone fail to do so. You can see the different arm prevention flags in the OSD, or in the CLI tab after sending a
statuscommandSome of the more common arm prevention flags are:
THROTTLE- Throttle is above the specifiedmin_checkvalue. Make sure that the throttle stick is all the way down when armingANGLE- The drone angle exceeds the specified angle limit. Make sure that the drone is levelNOPREARM- The prearm mode is not activeCALIB- The onboard sensors are still calibrating and are not ready to be used. Wait a little bit after powering on the droneRPMFILTER- BiDirectional DShot is enabled on the FC side, but the ESC is not sending RPM telemetry
There are also some that should only appear when using some sort of configuration interface (ie. connected to the Betaflight Configurator):
MSP- The drone is connected to mentioned configuration interface (Betaflight Configurator)CLI- You're in the CLI tab in the Betaflight ConfiguratorOSDorCMS- You're connected using the CMS (Configuration Menu System), be that in the OSD menu, or the radio LUA script
Motors Increase RPM Without Throttle Input
This is called I-term windup. In simple terms, the PID controller is attempting to correct itself, but it isn't able to do so. And so it keeps increasing the output, which in turn increases the error, which in turn increases the output, and so on.
-
Usually caused by the props not being on. If the drone cannot move, it will not be able to correct itself
-
If you have the motors or props oriented in such a way that they're all pushing the air upwards, not down, it will introduce the same effect
Drone Flips And Shuts Off on Takeoff
The "shut-off" part is an intended behavior, meant to protect against the drone spinning out of control, or even a complete flyaway. The FC will shut it down if it detects a large enough error
-
If the props are spinning in the wrong direction, the thrust will not be equal on one side, and the drone will flip. Make sure that the motor direction is correct, and that the props are oriented correctly
-
The motor and prop orientation may be correct, but Betaflight may expect a different orientation entirely. Make sure that the
Motor direction is reversedoption is set correctly in the Motors Tab
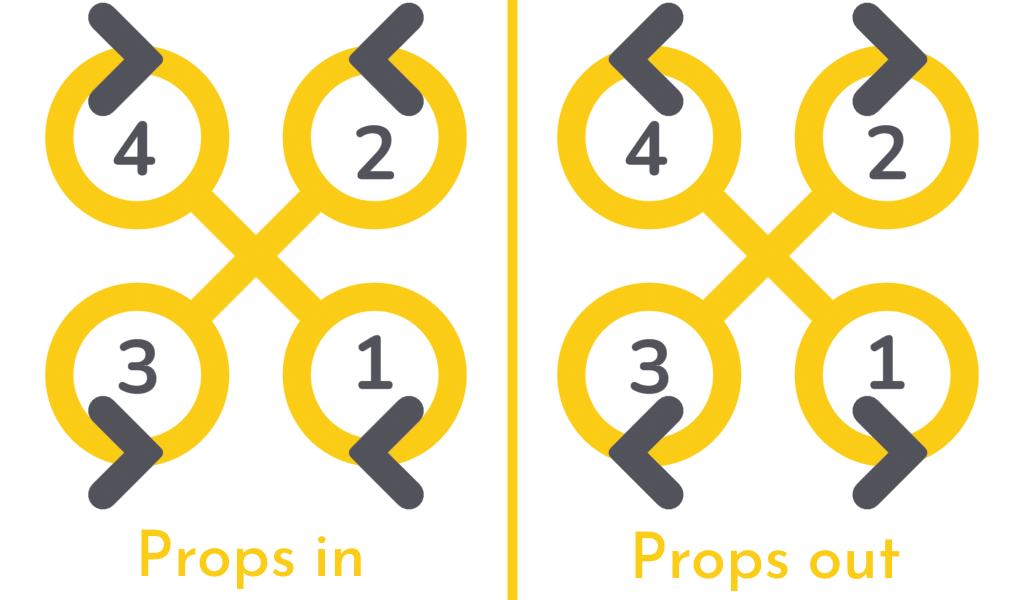
-
As shown in the image above, the motors are also expected to be mapped in a certain way. Make sure that spinning up Motor 1 in betaflight spins up the correct motor as on the diagram, and so on. This can be re-mapped through the CLI, or in new configurator versions in the graphical interface as well
-
Make sure the gyroscope is correctly aligned. This can easily be checked by moving the quad around, and seeing if every rotation responds correctly in the Betaflight model preview. If not, you can offset the gyro on each axis in the Configuration tab
-
Make sure that your radio axis channels are centered
Random Twitches During Flight
Usually caused by something mechanically loose in the drone, or even something directly touching the gyro. Clear the space around the gyro of any obstruction, and make sure that everything is tightened down and nothing is loose. If you're still experiencing bad flight performance, go through the Tuning Notes to get a proper PID tune. There are also great presets and tutorials on youtube as well